Basic module
Use the module below as the basis for each area of the page.
Section heading
Description of section.
Notice banners
Notice banners are shown in-card, contextual to the setting it refers to. We have three banners available: error states, warning banners, and default banners. Use the banner which reflects the urgency of the notice: if something stops the merchant from using the product, use the error banner; if it requires action on the merchant‘s part but isn‘t urgent, use the yellow banner; otherwise, the grey banner can be used.
Section title
Help text for this section goes here.
Section title
Help text for this section goes here.
Section title
Help text for this section goes here.
Account page structure
Every sales channel has an Account page. This page contains modules through which merchants can manage their sales channel account and settings. Until an account is successfully connected, only the Account connection module should be visible. All other modules should be hidden until the merchant has successfully connected their 3rd-party account.
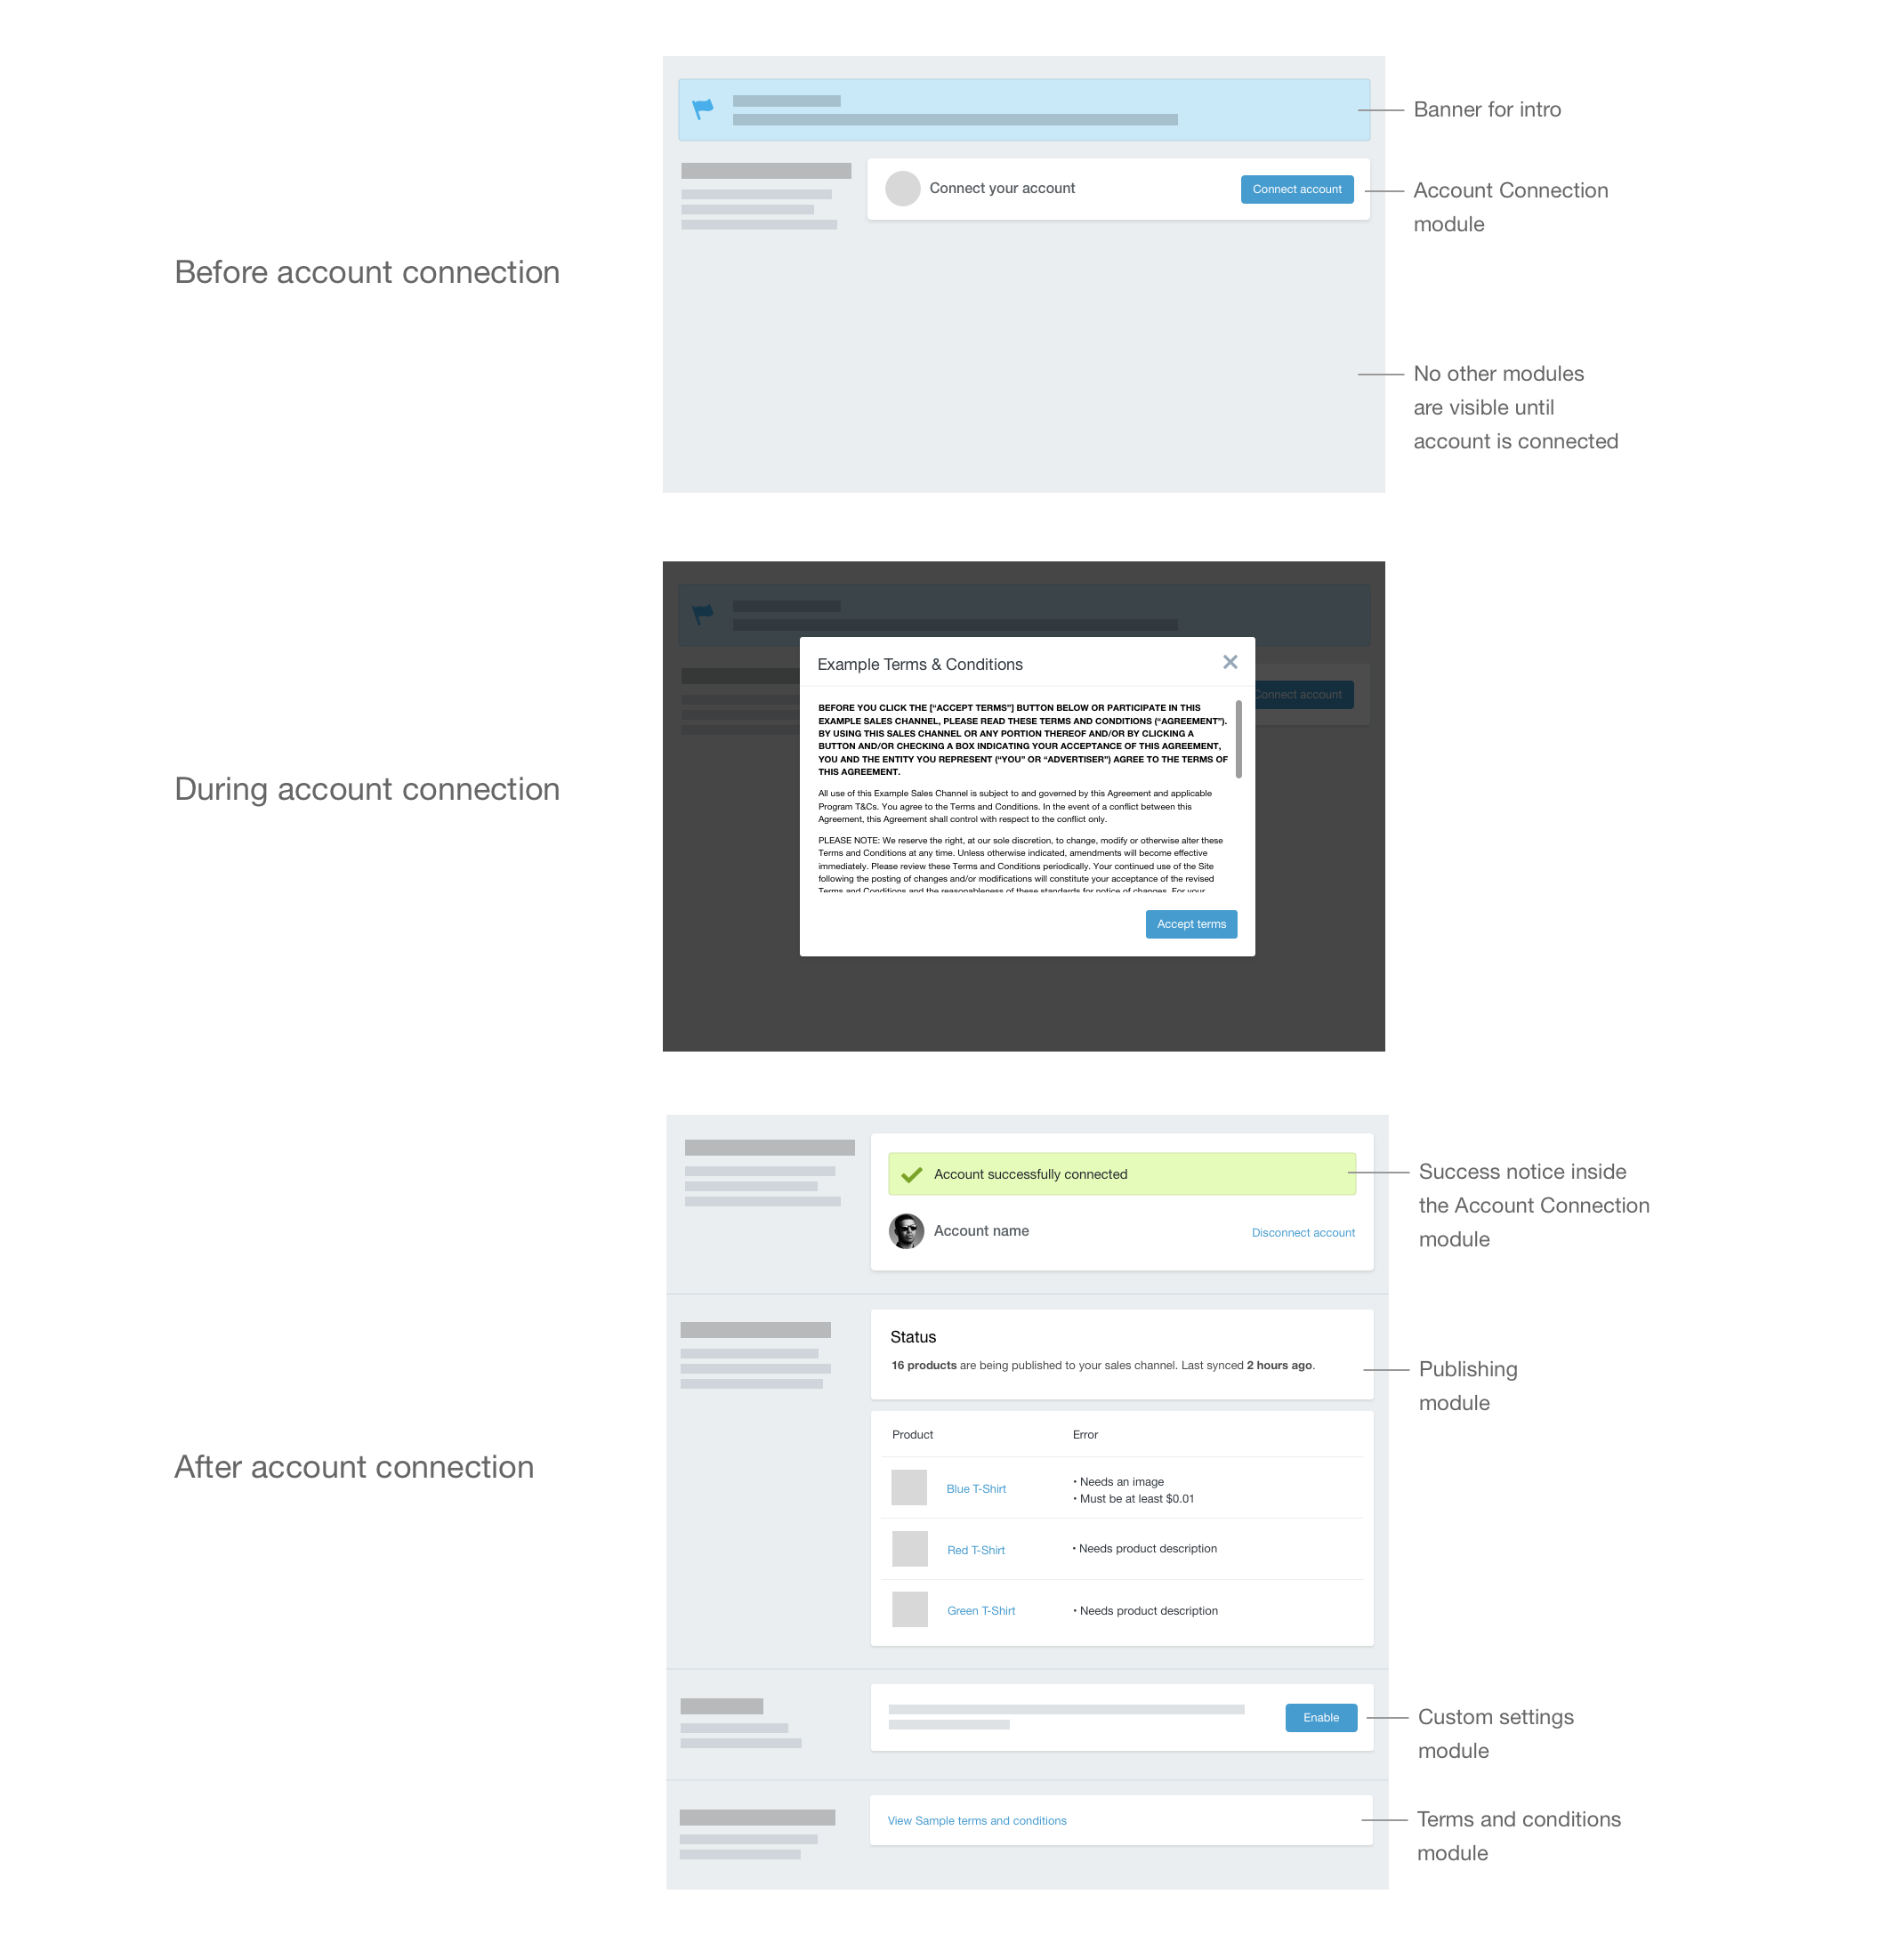
Account connection module
The account connection module sits at the top of the Account page. Through this, merchants can connect and disconnect their 3rd-party accounts, and see which account is connected to Shopify. Whether or not an account is connected, this module should always be visible.
Check eligibility first
If your sales channel operates best when merchants complete other steps prior to connecting their account, use the blue banner to communicate this step to the merchant. Disable Connect account until those steps have been completed.
[Sales channel] account
Connect your Shopify and [Sales channel] accounts together.
Connect account
When eligible merchants arrive at the Account page, use the blue banner to briefly explain the value of your sales channel.
If your sales channel has Terms and Conditions the merchant must accept, display those terms within a modal after the merchant clicks Connect account.
[Sales channel] account
Connect your Shopify and [Sales channel] accounts together.
Account connection successful
Merchants who have connected their account and accepted your Terms and Conditions (where applicable) should be shown a success banner right away. This banner is contained inside the Account Connection module. Use this banner to help merchants get started with your sales channel by suggesting an action. Feel free to adjust the content of the banner and the button to suit the needs of your sales channel.
[Sales channel] account
Connect your Shopify and [Sales channel] accounts together.
Connected
Merchants who have started using your sales channel should see this regular account connection module.
[Sales channel] account
This is the [Sales channel] account currently connected to Shopify.
Connection pending
Your sales channel may have a waiting list or approval process. If that is the case, clearly communicate this to the merchant using the blue banner within Connect account so that merchants understand before account connection that a delay may be involved in getting started with the sales channel.
After merchants connect their accounts and accept your Terms and Conditions (where applicable), show the yellow banner to confirm to the merchant that their setup is pending approval. Set expectations by telling merchants how long it may take before they can start selling.
[Sales channel] account
Connect your Shopify and [Sales channel] accounts together.
Connection error
If a merchant has connected their account and accepted your Terms and Conditions (where applicable), but is identified as ineligible to use your sales channel, inform them using the red banner. If possible, provide merchants with some way to resolve the issue.
[Sales channel] account
Connect your Shopify and [Sales channel] accounts together.
Accepting Terms and Conditions
Before a merchant successfully connects to your platform and begins selling on your sales channel, they must accept your Terms and Conditions. Display your Terms inside a modal right after your sales channel has detected an account connection.
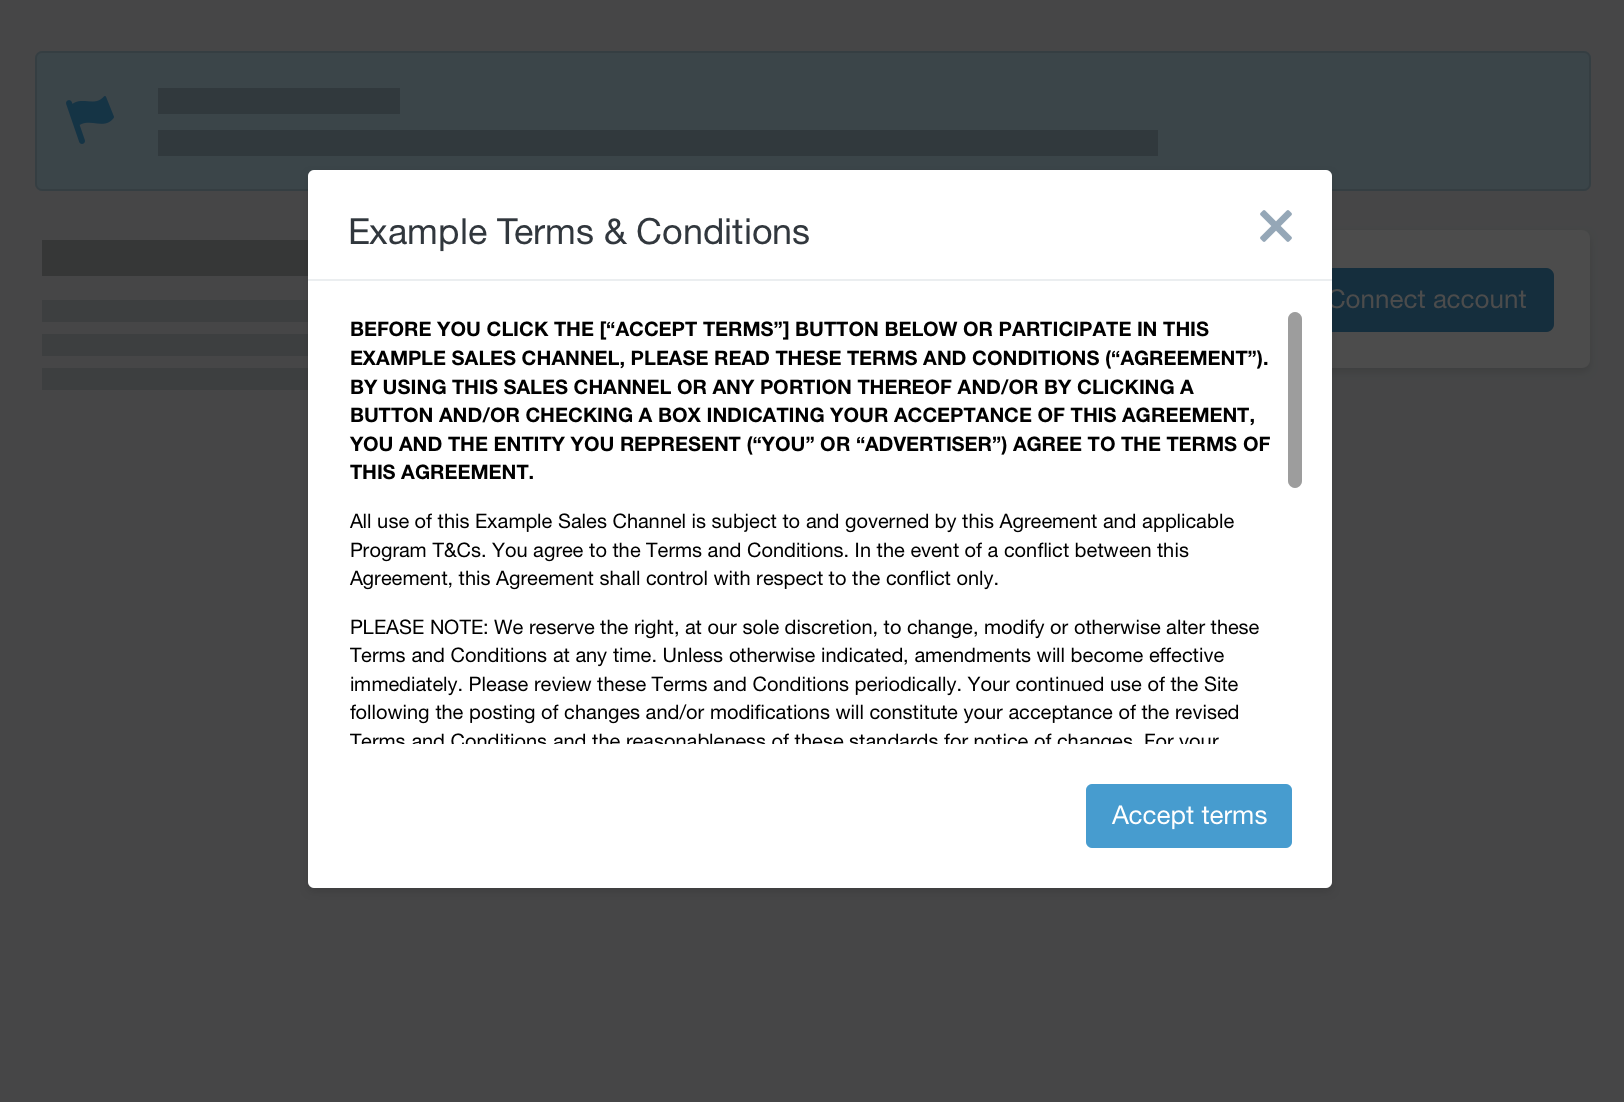
The account details and success banner is shown only if the Terms have been accepted. If the merchant does not click Accept terms, revert the account connection module such that no account is connected or listed.
For more on implementing modals, see Modals.
Publishing module
If your sales channel publishes products to a storefront, merchants will need to be notified of any relevant errors related to the products being displayed. The status box tells merchants how many of their products have been successfully published and the errors table lists all products that aren't displaying. In the same table are the issues related to each product, so merchants can resolve them if they wish to publish a blocked product.
The errors table should have no more than 6 products per page before paginating the table and displaying the page navigation controls.
Publishing
Products that are being published to [Sales channel], or have errors preventing their publication, are shown here.
Errors
| Product | Status | |
|---|---|---|
|
|
Some Product |
|
|
|
Another Product |
|
|
|
One More Product |
|
Publishing
Products that are being published to [Sales channel], or have errors preventing their publication, are shown here.
Terms and Conditions module
Merchants using your sales channel should have access to your terms and conditions at all times. They should be hosted elsewhere, but linked to from the terms and conditions module. The module is always visible after account connection and should be positioned at the bottom of the Account page.
Terms and Conditions
You can view the [Sales channel] Terms and Conditions here at anytime.
Other modules
If the sales channel requires any other settings, we have a binary setting style and option settings style, which you may configure to suit your needs. We also have a collection of other form inputs and modals your sales channels can use.
Settings
Section title
Help text for this section goes here.
Section title
Help text for this section goes here.
Section title
Help text for this section goes here.
Section title
Help text for this section goes here.
Forms
Forms require the UI Kit JavaScript package. The script manages the focus and blur states for inputs. Simply include a link to the script and it will self initialize.
Modals
The EASDK includes methods for a few different types of modals documented in the EASDK docs. These modals are rendered in Shopify itself so that the full screen nature of modals is properly handled and the modal within your sales channels matches other modals in Shopify.
A basic modal for accepting Terms and Conditions, for example, can be created using the Embedded App SDK and the code below:
        ShopifyApp.Modal.open({
          src: 'https://example.com/app/path',
          title: 'A new modal',
          width: 'small',
          height: 300,
          buttons: {
            primary: {
              label: "Accept terms",
              callback: function (label) {
                ShopifyApp.Modal.close();
                myApp.someMethod(); // terms accepted
              }
            }
          }
        }, function(result, data){
          console.log("result: " + result + " data: " + data);
        });
For the purposes of your sales channel, we strongly recommend using an iframe modal which can contain and display any page.