Empty states
Your sales channel may require a screen like this if merchants need to create content specifically for your platform (e.g. posts, ads, etc) or must create listings for individual products. Use this empty state when merchants have successfully set up the sales channel and can publish content to your platform, but haven’t done so yet.
You don't have any products on Sample yet
Create a listing to begin selling your products on Sample

Title: A concise explanation of why the merchant is seeing this screen.
Subtitle: A short sentence that communicates what the merchant has to do next.
Note: titles are not punctuated.
Illustration: A visual to represent what the merchant needs to do. This illustration must be in the color #C3CFD8 and must have a transparent background.
Call to action (CTA): A button that directs the merchant to perform their primary task in this channel (e.g. adding a product, creating a listing, etc)
Help footer: see Help footer section
Basic page layout
Sales channels have two main content areas. This structural pattern persists across many of the modules and functionality outlined in this document:
-
Contextual area (left sidebar, on desktop)
The title and description of each section is used to give the merchant context needed to make decisions in your sales channel.
Title: What information, feature, or functionality is the merchant dealing with in this section? Be concise, and use your own platform’s terminology where possible. (e.g. “Inventory management”)
Description: A one-sentence description of why this information or functionality is important, and how it benefits/affects the merchant. You may also include a text link pointing to documentation, or more information on your platform’s site (i.e. “Learn more about [feature name]”)
-
Functional area (main/right side, on desktop)
The main area of each section in a sales channel is used to give the merchant control of some part of their experience using your platform (or your sales channel), or communicate vital information such as product publishing status, errors, or settings.
The modules outlined below show you how to include different types of content or functionality in the Functional area of a sales channel.
Banners
The banner module can be implemented with four different colors, each used for different purposes:
- Blue: Basic messages (Welcome messages, feature announcements, explaining next steps)
- Green: Success messages (channel setup, product publishing, successful content creation)
- Yellow: Low-impact status messages (store being reviewed, products being reviewed)
- Red: High-impact messages (Errors, products rejected/banned from the platform, store rejected/banned from the platform)
Message: The main body of the banner. Maximum two sentences, unless the banner has multiple separate points (use the bullet list banner for these cases)
Call to action: Banner CTAs can be inline text links (lower priority) or buttons (higher priority). Use a button for direction the merchant to resolve errors, and use inline links for helpful information, links to documentation, or linking to other sections of your channel or Shopify.
Bolding: Use bold text sparingly to set parts of the banner message apart for clarity. Bold things like product names or important information like waiting times.
Banners are usually shown at the top of the page. For highly contextual messaging, banners can be shown within sections. These banners typically refer to settings or features within that same section.
Section title
Help text for this section goes here.
Account connection
The account connection module sits at the top of the Account page. Use this to let merchants connect and disconnect various accounts (to your platform, and 3rd-parties for sharing purposes, etc) and see which accounts are connected to Shopify through your channel. Whether or not an account is connected, this section should always be visible.
Before an account is successfully connected, this section must link out to your channel/platform’s terms and conditions, and specify all charges or fees that a merchant may incur by using your channel. Clicking on the “Terms and conditions” link should open up the terms hosted on your platform’s website in a new browser window.
Sample account
Connect your Sample account to your store.
No account connected
Section title: Name the platform or service you are asking the merchant to authenticate (e.g. “Facebook account”, “[your platform] account”)
Section description: Explain what the merchant benefit is for authenticating (e.g. “Connect your [sample] account to list your products”)
Connect button: Use consistent terminology in this section—the button action should match what merchants are being told to do (i.e. “connect”)
Clicking “Connect” should open up your platform or service’s authorization page (i.e. oauth) within a popup window. Within this window, merchants should clearly recognize your brand and be able to log in or sign up for your service. If your platform requires additional personal details (e.g. billing), prompt merchants for that information within this popup.
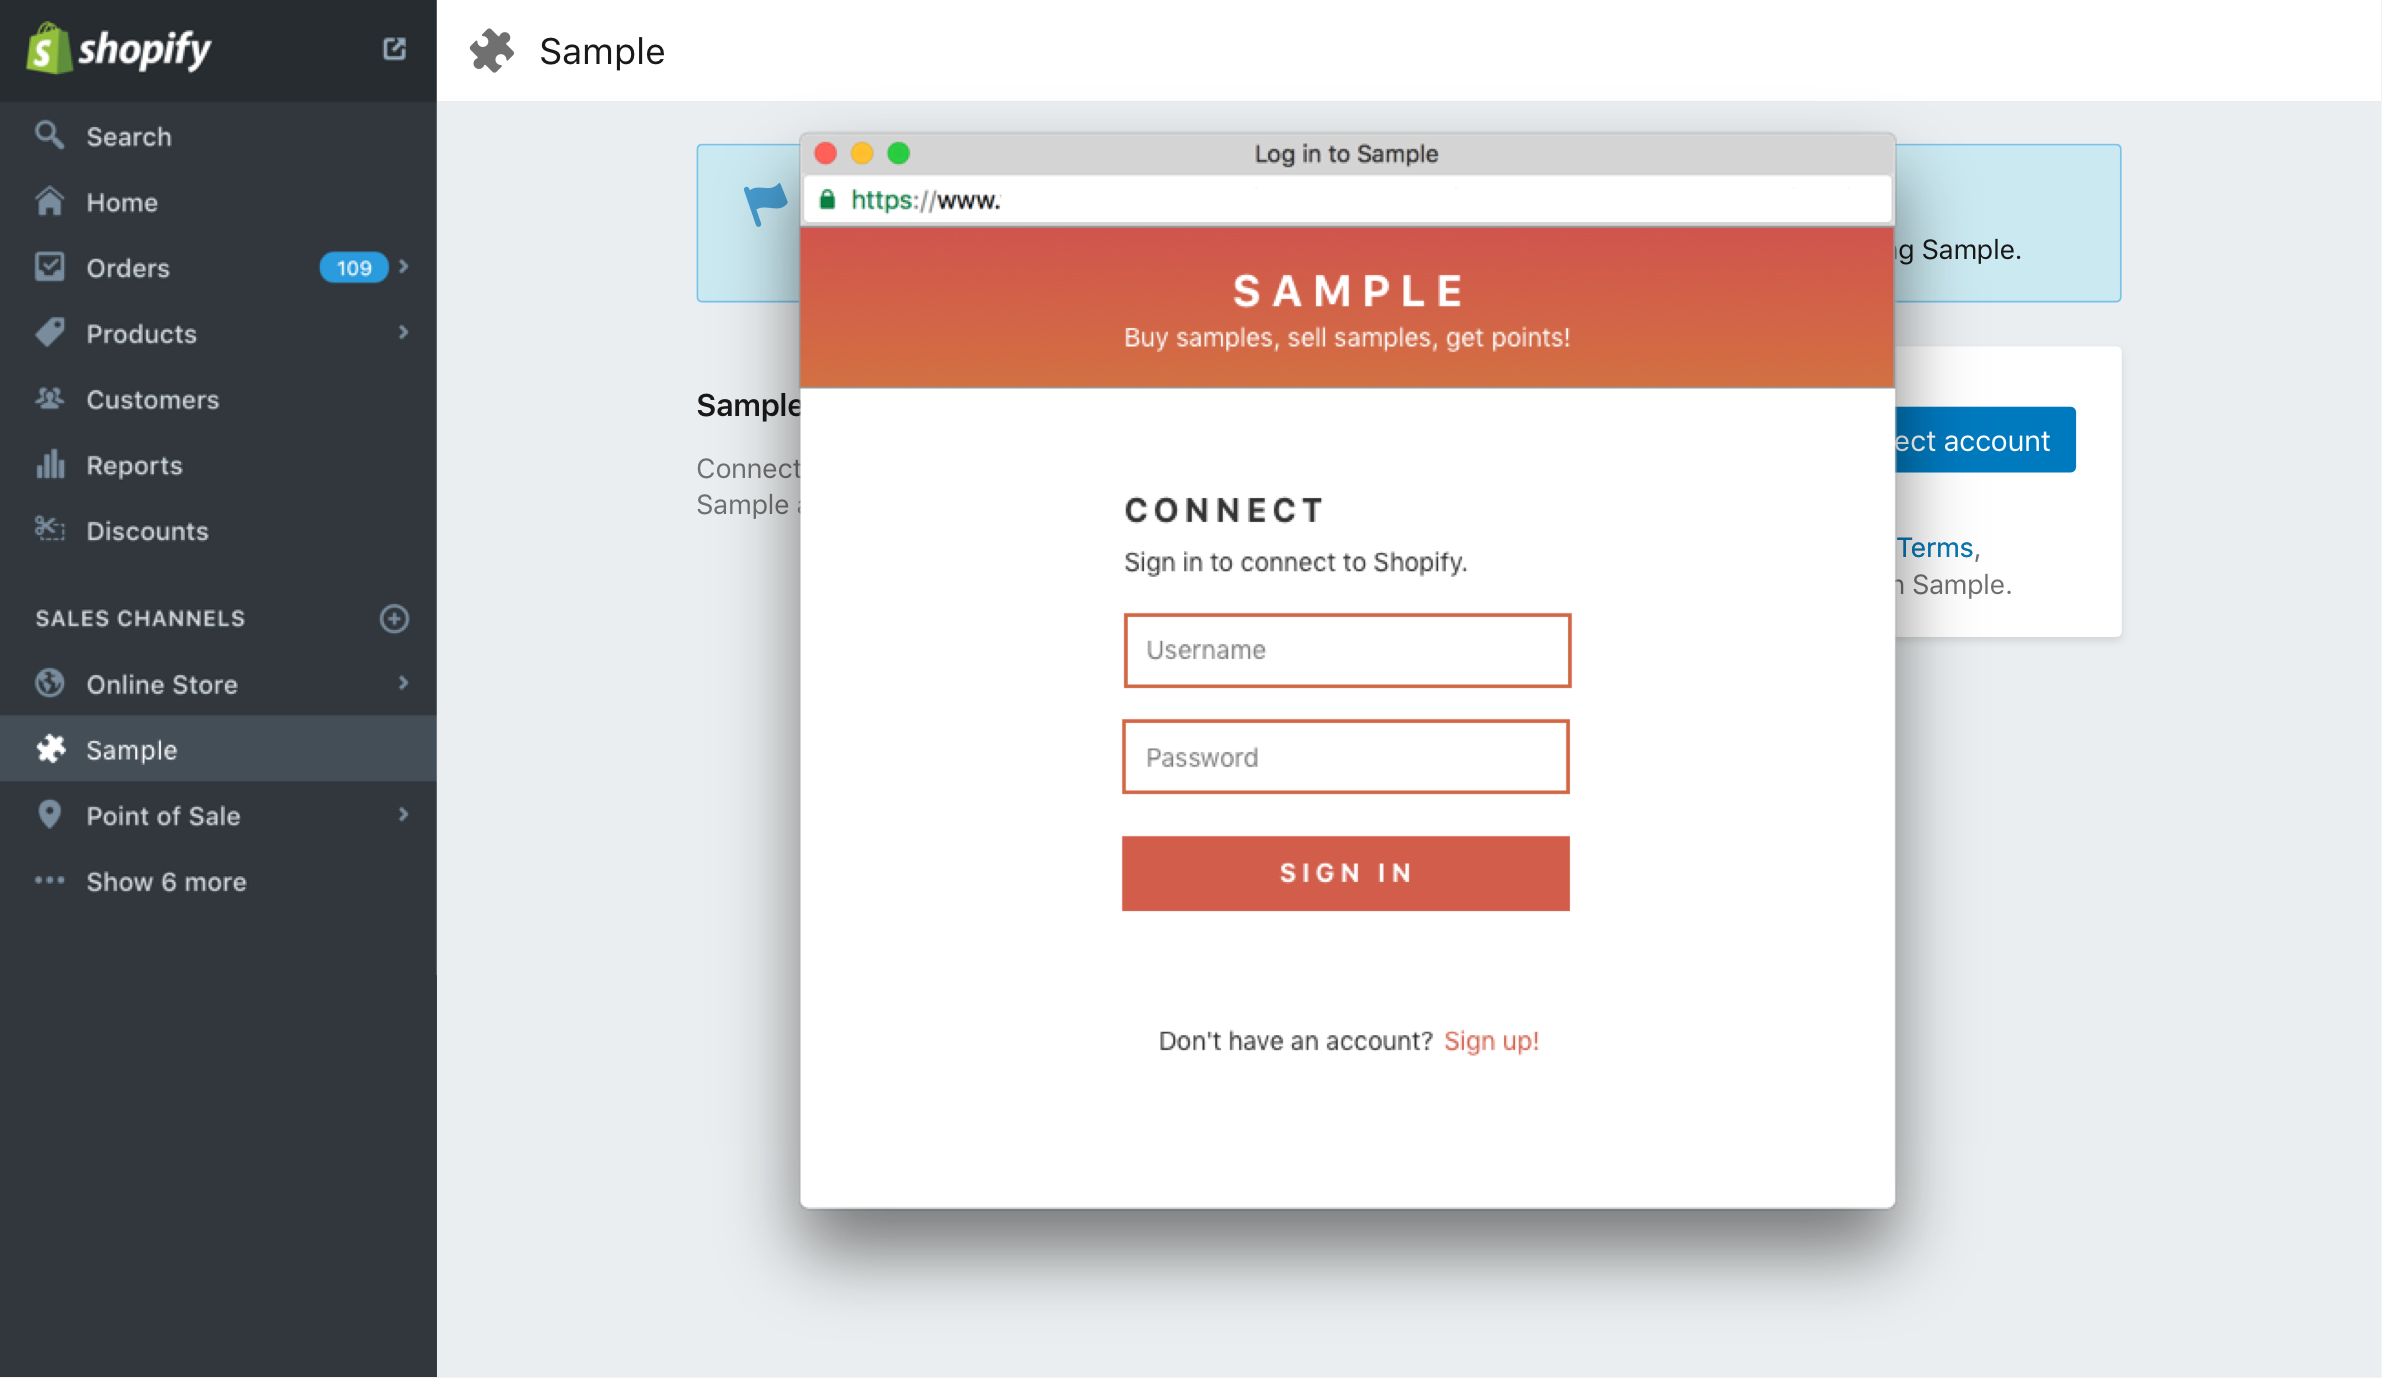
Once successfully authorized, the popup should automatically close. Refresh the sales channel page to reflect the successful account connection.
If merchants must complete any additional setup steps or go through a review process, communicate this immediately after successful account connection.
Sample account
Connect your Shopify and Sample accounts together.
Tobi
- Shop name
- shoptobi
Sample account
Connect your Shopify and Sample accounts together.
Tobi
- Shop name
- shoptobi
Otherwise, if there are no additional setup steps, your sales channel can display a success banner at the top of the page. The success banner appears once, and goes away once the merchant refreshes or returns to this page later.
Sample account
Connect your Shopify and Sample accounts together.
Tobi
- Shop name
- shoptobi
Settings modules
Your sales channel may have settings or features that merchants can enable/disable, configure, or review. This may include settings for your platform that you choose to make available to merchants through your sales channel.
There are 3 variations (Information, Feature toggles, and Customization) of Settings functionality:
Feature toggles
Feature toggles are used to give the merchant control over specific features or options in your sales channel, or for your platform.
Section title
Help text for this section goes here.
Section title
Help text for this section goes here.
Be sure to include specific body content for both Enabled and Disabled states of the feature toggle.
Clearly state whether the feature is “enabled” or “disabled,” and then explain what the implications are to the merchant. (e.g. “Automatic messages are disabled. Your customers will not receive automatic shipping updates.”)
Unless it does not make sense for your specific use case, use “Enable” and “Disable” language consistently across your feature toggles, in body content and in the buttons.
Section title
Help text for this section goes here.
Sometimes features or options will be unavailable to merchants, and cannot be toggled. In this case, clearly state that the feature is “not available” and then provide a reason why. Also include, if possible, an actionable next step for merchants to make the functionality available to them.
Generic information
Information areas are used to communicate static content to merchants using your sales channel. This could include cost or fee structure, review status, account status, etc. Each information area has a title and a body area. Follow the same guidelines as the Contextual areas above for this content.
Commission
Help text for this section goes here.
Customization options
Customization options are more complex versions of feature toggles – instead of enabling or disabling a single feature, merchants may configure some aspect of their account on your platform, or their use of your sales channel.
Add to cart button
Customize the Add to Cart button that appears with your products on Sample.
Customization dropdown menus should have smart default settings that are clearly labeled. They also require titles. (e.g. Position, Color, etc)
Forms
Forms are divided into form areas to help user flow and lighten the burden on merchants. Refrain from using multi-step forms in your sales channel. Only ask for necessary information.
Forms require the UI Kit JavaScript package. The script manages the focus and blur states for inputs. Simply download and include the script and it will self initialize.
Form labels: Form labels are placed above or beside the form field. Labels should be in sentence case, and describe the field, not the action. (e.g. “Title,” “Product name”)
Placeholder text: Placeholder text is placed inside the form field. Use only when there is an opportunity to teach merchants what to include. Placeholder text should use real examples, rather than directions or lorum ipsum text. (e.g. “e.g. Blue Oxford Shirt”)
Helper text: Help text is placed below the form field, and should be concise. It's used when incorrect formatting will result in an error, explaining new terminology or jargon to a merchant, or when the merchant doesn't know what format is required. (e.g. “9-digit number”)
Selection dropdowns: If one of the list items is preferred, make it the default selection. If you need an empty state option, use the term "Select", followed by an ellipsis. (i.e. “Select…”)
Tables
Tables can be used in your sales channel to capture product status, or listings on your platform. Do not use tables to communicate errors in publishing, which can be done with the Publishing module.
| Product and listing | Publish date | Category | Status | ||
|---|---|---|---|---|---|
|
|
Some Product
Description of Some Product
|
Oct 1, 11:08am | Seasonal deals | Posted | View listing |
Product/listing titles: Each row in a table module should be focused around one of the merchant’s products or listings – they are the primary object. If displaying a table of listings, the title of the listing should be hyperlinked to the original Shopify product, to give the merchant proper context.
Column headers: Headers should be short and descriptive. Avoid using prepositions and articles so your headers fit properly on mobile devices.
Link columns: If your table module includes a column dedicated to external links (e.g. a link to the merchant’s product on your site/platform) then it does not require a column header. Use a text link with a simple call to action (i.e. “View listing”)
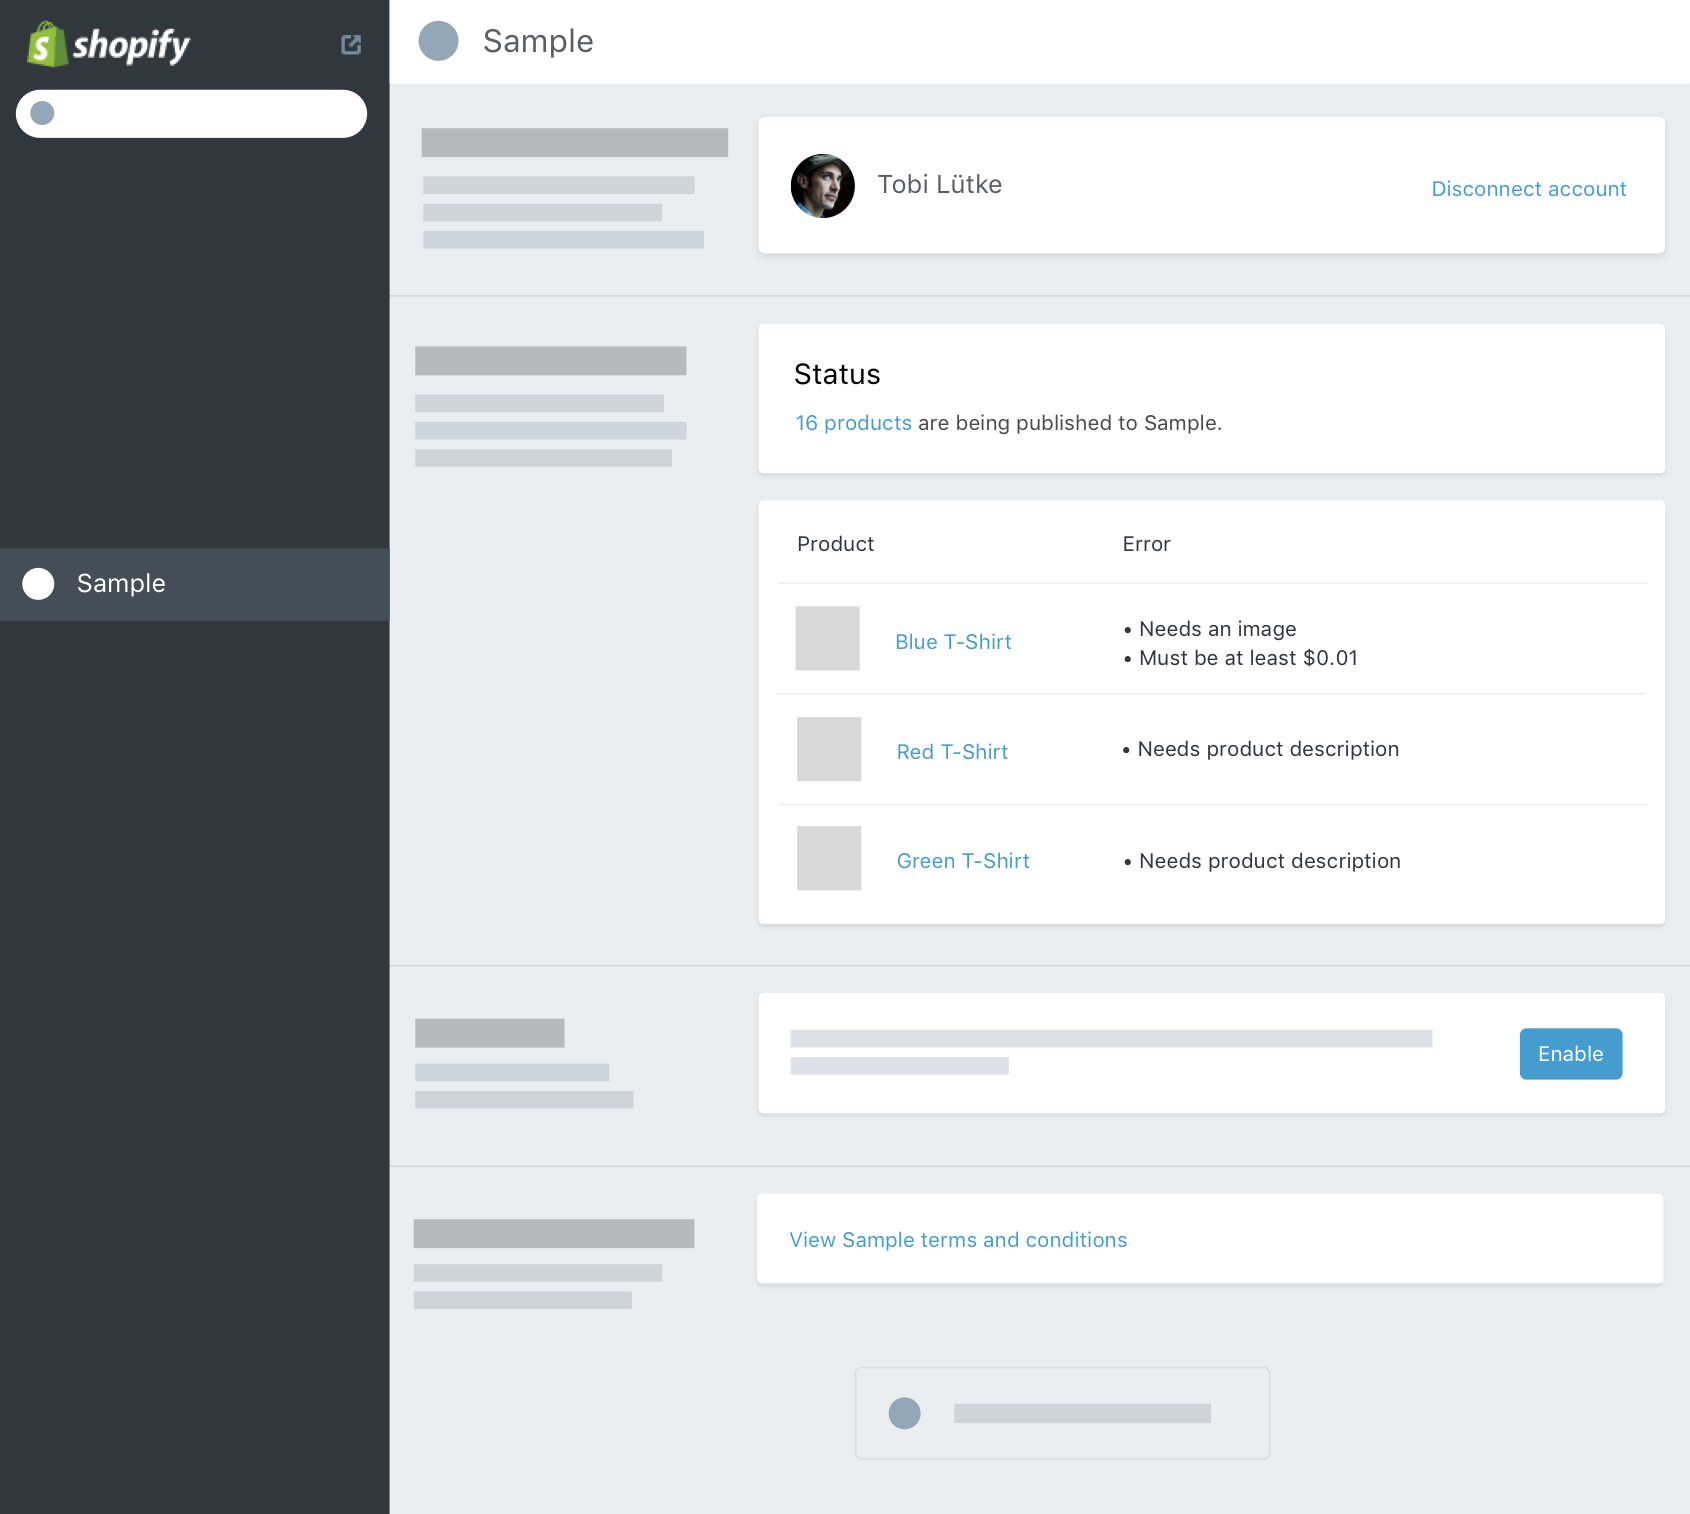
Publishing
If your sales channel publishes products to a storefront, merchants will need to be notified of any relevant errors related to the products being displayed. The status box tells merchants how many of their products have been successfully published and the errors table lists all products that aren't displaying. In the same table are the issues related to each product, so merchants can resolve them if they wish to publish a blocked product.
Within the Status card, show a count of products published to your sales channel. That count should link to Shopify's bulk editor, where merchants can easily see and manage the products they've published.
The errors table should have no more than 6 products per page before paginating the table and displaying the page navigation controls.
Publishing
Products that are being published to Sample, or have errors preventing their publication, are shown here.
Publishing
Products that are being published to Sample, or have errors preventing their publication, are shown here.
Terms and conditions
Merchants using your sales channel should have access to your terms and conditions at all times. They should be hosted elsewhere, but linked to from the terms and conditions module. The module is always visible after account connection and should be positioned at the bottom of the Account page.
Terms and conditions
You can view the Sample Terms and conditions here at anytime.
Help footer
This footer must exist on every page of your sales channel, and links to documentation or support for your sales channel.
Modals
The EASDK includes methods for a few different types of modals documented in the EASDK docs. These modals are rendered in Shopify itself so that the full screen nature of modals is properly handled and the modal within your sales channels matches other modals in Shopify.
A basic modal for accepting Terms and conditions, for example, can be created using the Embedded App SDK and the code below:
ShopifyApp.Modal.open({
  src: 'https://example.com/app/path',
  title: 'A new modal',
  width: 'small',
  height: 300,
  buttons: {
    primary: {
      label: "Accept terms",
      callback: function (label) {
        ShopifyApp.Modal.close();
        myApp.someMethod(); // terms accepted
      }
    }
  }
}, function(result, data){
  console.log("result: " + result + " data: " + data);
});
For the purposes of your sales channel, we strongly recommend using an iframe modal which can contain and display any page.